Operation
Contents
Scheduling your first test observation
Prerequisites
- You've set up your SatNOGS client successfully
- You've created an account on the Network, created a ground station, and it's showing up as "online"
If you've run into any problems with those steps, check out the Troubleshooting page or ask for help in the community forum, the Matrix room, or on IRC at #satnogs on Libera Chat.
SatNOGS Network
- Navigate your ground station page in the Network Environment (user name -> "My Profile" -> click on the name of your ground station).
- Select the "Upcoming passes" tab.
- Look for a pass with a "schedule" button that isn't greyed out, and click it. Ensure it is a good (high) pass of an operational satellite (check the color bar on the satellite)
- In the "New Observation" page that comes up, click the "Calculate" button, then click "Schedule".
- You should now see a page for that observation; in the "Waterfall" tab, you should see "Waiting for waterfall".
- You can also schedule multiple observations at once for a single satellite via the "Observation new page".
Ground Station
Now SSH to your ground station computer and run these steps:
- Follow the satnogs-client logs. Depending on your setup, this might be done with
journalctl -f -u satnogs-client.service, ortail -F /var/log/supervisor/satnogs.log - Before the observation is scheduled to start, you should see your client wake up once per minute to check for new jobs:
Oct 02 00:16:02 raspberrypi satnogs-client[10124]: 2017-10-02 00:16:02,477 - satnogsclient - DEBUG - Opening TCP socket: 127.0.0.1:5011
Oct 02 00:16:02 raspberrypi satnogs-client[10124]: 2017-10-02 00:16:02,479 - satnogsclient - DEBUG - Sending message: [{"origin": "network", "transmitter": "uXJ8NQNcH8b9osRc
Oct 02 00:16:02 raspberrypi satnogs-client[10124]: 2017-10-02 00:16:02,488 - apscheduler.executors.default - INFO - Job "get_jobs (trigger: interval[0:01:00], next run at: 2
Oct 02 00:16:59 raspberrypi satnogs-client[10124]: 2017-10-02 00:16:59,615 - apscheduler.executors.default - INFO - Running job "get_jobs (trigger: interval[0:01:00], next r
Oct 02 00:16:59 raspberrypi satnogs-client[10124]: 2017-10-02 00:16:59,661 - apscheduler.executors.default - INFO - Running job "post_data (trigger: interval[0:02:00], next
Oct 02 00:16:59 raspberrypi satnogs-client[10124]: 2017-10-02 00:16:59,668 - apscheduler.executors.default - INFO - Job "post_data (trigger: interval[0:02:00], next run at:
Oct 02 00:17:00 raspberrypi satnogs-client[10124]: 2017-10-02 00:17:00,906 - satnogsclient - DEBUG - Opening TCP socket: 127.0.0.1:5011
Oct 02 00:17:00 raspberrypi satnogs-client[10124]: 2017-10-02 00:17:00,908 - satnogsclient - DEBUG - Sending message: [{"origin": "network", "transmitter": "uXJ8NQNcH8b9osRc
Oct 02 00:17:00 raspberrypi satnogs-client[10124]: 2017-10-02 00:17:00,912 - apscheduler.executors.default - INFO - Job "get_jobs (trigger: interval[0:01:00], next run at: 2
- At the scheduled time for the observation, you should see the client kick off the observation:
Oct 02 00:18:00 raspberrypi satnogs-client[10124]: 2017-10-02 00:18:00,774 - satnogsclient - DEBUG - Opening TCP socket: 127.0.0.1:5011
Oct 02 00:18:00 raspberrypi satnogs-client[10124]: 2017-10-02 00:18:00,776 - satnogsclient - DEBUG - Sending message: [{"origin": "network", "transmitter": "uXJ8NQNcH8b9osRc
Oct 02 00:18:00 raspberrypi satnogs-client[10124]: 2017-10-02 00:18:00,781 - apscheduler.executors.default - INFO - Job "get_jobs (trigger: interval[0:01:00], next run at: 2
Oct 02 00:18:22 raspberrypi satnogs-client[10124]: 2017-10-02 00:18:22,022 - apscheduler.executors.default - INFO - Running job "spawn_observer (trigger: date[2017-10-02 00:
Oct 02 00:18:22 raspberrypi satnogs-client[10124]: 2017-10-02 00:18:22,082 - satnogsclient - DEBUG - Opening TCP socket: 127.0.0.1:4533
Oct 02 00:18:22 raspberrypi satnogs-client[10124]: 2017-10-02 00:18:22,109 - satnogsclient - DEBUG - Sending message: p
Oct 02 00:18:22 raspberrypi satnogs-client[10124]: 2017-10-02 00:18:22,110 - satnogsclient - DEBUG - Received message: 0.000000
Oct 02 00:18:22 raspberrypi satnogs-client[10124]: 0.000000
Oct 02 00:18:22 raspberrypi satnogs-client[10124]: 2017-10-02 00:18:22,111 - satnogsclient - DEBUG - Opening TCP socket: 127.0.0.1:4532
Oct 02 00:18:22 raspberrypi satnogs-client[10124]: 2017-10-02 00:18:22,115 - satnogsclient - DEBUG - Sending message: P 188.276951189 -0.0155264223734
Oct 02 00:18:22 raspberrypi satnogs-client[10124]: 2017-10-02 00:18:22,119 - satnogsclient - DEBUG - Received message: RPRT -1
Oct 02 00:18:22 raspberrypi satnogs-client[10124]: 2017-10-02 00:18:22,143 - satnogsclient - DEBUG - Sending message: F 436038107
Oct 02 00:18:22 raspberrypi satnogs-client[10124]: 2017-10-02 00:18:22,144 - satnogsclient - DEBUG - Received message: RPRT 0
- After the observation is over, you should see the client submit the data to the SatNOGS network
In the SatNOGS Stage Environment, refresh the Observation page. You should now see a waterfall plot for your data.
If that all worked -- congratulations! You've just successfully completed your first SatNOGS observation.
If it didn't work, don't feel bad -- it can take a few attempts before you get it right. Have a look at the Troubleshooting page for tips, and don't forget to contact the community if you need help.
Rating observations
Observations are rated automatically by algorithm based on specific criteria that depend on Artifacts. There are 4 different statuses:
- Unknown
- "Unknown" status means that algorithm wasn't able to determine automatically how to rate the observation. In this case user needs to give feedback by vetting the artifacts of the observation.
- Good
- "Good" status means that algorithm was able to determine the presence of the satellite in one of the artifacts of the observation.
- Bad
- "Bad" status means that algorithm wasn't able to determine the presence of the satellite in one of the artifacts of the observation.
- Failed
- "Failed" status means that algorithm was able to determine that something went wrong during the observation. There are two cases that fall under this category:
- Absence of artifacts: In this case there are no uploaded artifacts by the station in a defined time period.
- Malformed artifacts: In this case there are uploaded artifacts but with malformed or unexpected format, for example Audio artifact duration is different than the scheduled one.
- "Failed" status means that algorithm was able to determine that something went wrong during the observation. There are two cases that fall under this category:
Vetting artifacts
Currently vetting of Artifacts is only implemented for Waterfall artifact.
Waterfall
Status
Once waterfall is posted back in the Network by SatNOGS Client, by default, would be unvetted. User can manually vet waterfall, in waterfall tab, using one of the next choices:
- With Signal
- You should vet waterfall as "With Signal" when it is clear from the waterfall that the observed satellite is present. Keyboard Shortcut 'g'.
- Without Signal
- You should vet waterfall as "Without Signal" when by examining the waterfall it is obvious that the observed satellite isn't present. Keyboard Shortcut 'b'.
- Unknown
- You should leave or vet waterfall as "Unknown" when by examining the waterfall it is not clear if there is or not presence of the observed satellite. Keyboard Shortcut 'u'.
Examples
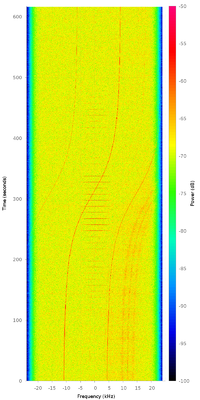
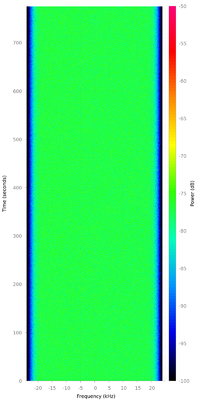
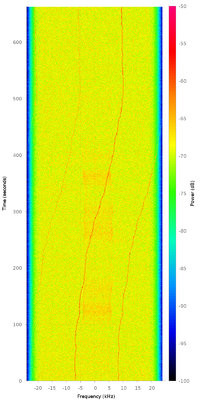
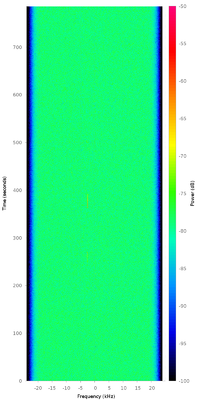
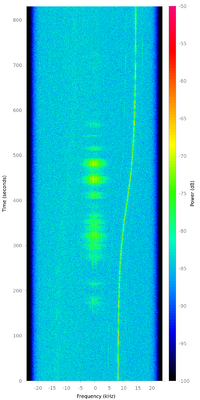
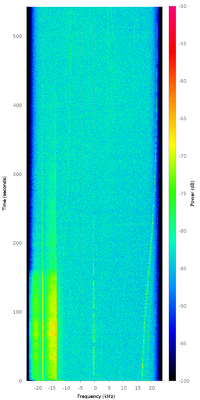
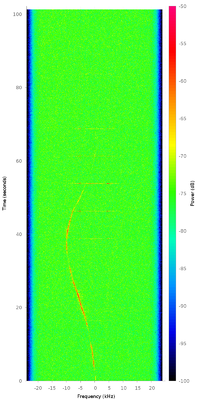
Below is a collection of waterfalls with possible results of observations:
You can see more in Taxonomy_of_Observations.
Network Permissions Matrix
| User | View and discuss observation | Vet observation | Delete future observation | Schedule observation |
|---|---|---|---|---|
| Non Authenticated | All | None | None | None |
| Authenticated | All | None | None | None |
| Station Owner (Future) | All | None | None | None |
| Station Owner (Offline) | All | Own(stations or observations) | Own(stations or observations) | None |
| Station Owner (Testing) | All | Own(stations or observations) | Own(stations or observations) | Own(stations) |
| Station Owner (Online) | All | All | Own(stations or observations) | All(online stations) |
| Moderator | All | All | All | All |
| Admin | All | All | All | All |
Examples:
- Authenticated user can view and discuss on all the observation. User can not vet or delete an observation. User can not schedule observation in any station.
- Station Owner with at least one online station can view and discuss on all observations. Online station owner can vet or delete observations on stations that owns. Online station owner can vet or delete observation that has scheduled. Online station owner can schedule observations on all online stations.
