Raspberry Pi
Contents
Intro
The Raspberry Pi 3 is the reference platform for SatNOGS. You can try using various distributions for this (eg. Arch, Fedora), but the one we suggest is our custom image based on latest Raspbian.
Raspbian
Download
You can download the latest Raspbian SatNOGS image following the links from the latest tag on GitLab.
Artifacts list
The current artifacts list consists of:
- A Zipped image file
- An Image info file
- A SHA256 checksums file
Data integrity verification
You should verify the data integrity of the artifacts by checking the SHA256 checksums. On Linux, run sha256sum -c sha256sums in the directory where the artifacts are downloaded
Example:
$ sha256sum -c sha256sums
2017-09-29-Raspbian-SatNOGS-master-lite.info: OK
image_2017-09-29-Raspbian-SatNOGS-master-lite.zip: OK
Flashing and Setup
Follow the usual Raspbian flashing instructions, and boot your Raspberry Pi.
Once your Raspberry Pi is booted, log in with username "pi" password "raspberry" and run:
sudo raspi-config
You will want to be sure to do the following:
- Set a strong, unique password
- Change localization settings:
- by default the rpi locale is configured for EN-GB, change as appropriate (ie: to EN_US.UTF-8)
- set timezone (we recommend UTC so your logs match the times in Network)
- set keyboard layout, again this is defaulting to a UK layout
- set wifi country
- Finish and reboot
Next, run
sudo apt-get update && sudo apt-get -y upgrade
Networking
If you are using wired Ethernet you should get connectivity right away. If you are using wireless then see this doc for network configuration instructions.
Setup
SSH to the Raspberry Pi with user "pi" and password "raspberry" (no quotes). Run "sudo satnogs-setup" to set basic configuration. Select "quit" when you are finished, and the Raspberry Pi will reconfigure itself; this may take some time.
- Note: you can always reconfigure the software by running "sudo satnogs-setup -n" again.
Basic setup
- SATNOGS_API_TOKEN: The API token assigned to your ground station on the SatNOGS Network website.
- SATNOGS_NETWORK_API_URL: The API for the SatNOGS network site. If you're working on the stage environment, this is https://network-dev.satnogs.org/api/; if you're working on the prod environment, this is https://network.satnogs.org/api/.
- SATNOGS_RX_DEVICE: If you are using an RTL-SDR, this is
rtlsdr. Other devices supported by gr-satnogs includeusrpb200,usrp2,airspyorhackrf; a complete list can be found here.
- SATNOTS_STATION_ELEV: The elevation of your ground station in metres.
- SATNOTS_STATION_ID: The ID assigned to your station in the SatNOGS network site (either stage or prod).
- SATNOTS_STATION_LAT: The latitude of your station. North is positive, south is negative.
- SATNOTS_STATION_LONG: The longitude of your station. East is positive, west is negative.
- HAMLIB_UTILS_ROT_ENABLED: Whether or not to enable the Hamlibs rotator daemon. Rotctld is a software daemon that provides a network server to control a rotator on a serial port. If you don't have a rotator (like the No rotator setup), enter
False.
- HAMLIB_UTILS_ROT_OPTS: Options for rotcld. For a yaesu rotator, use
-m 601 -r /dev/ttyACM0 -s 9600 -T 0.0.0.0
Updating
To update SatNOGS software, re-run sudo satnogs-setup. This will pull the latest Ansible playbook and update if necessary.
Raspbian packages can be updated using the normal APT updating methods (e.g. apt-get upgrade or aptitude).
WARNING: An update can potentially interrupt a running observation!
Testing
To see if satnogs-client has started successfully, check the logs with journalctl:
journalctl -u satnogs-client.service
You should see entries running approximately once per minute that look like this:
Oct 01 23:02:13 raspberrypi satnogs-client[6695]:  * Running on http://0.0.0.0:5000/ (Press CTRL+C to quit)
Oct 01 23:02:14 raspberrypi satnogs-client[6695]: 2017-10-01 23:02:14,466 - satnogsclient - INFO - [LD] Downlink thread waiting for first downlink packet
Oct 01 23:03:14 raspberrypi satnogs-client[6695]: 2017-10-01 23:03:14,450 - apscheduler.executors.default - INFO - Running job "get_jobs (trigger: interval[0:01:00], next run at: 2017-10-01 23:03:14 UTC)" (scheduled at 2017-10-01 23:03:14.423393+00:00)
Oct 01 23:03:47 raspberrypi satnogs-client[6695]: 2017-10-01 23:03:47,324 - satnogsclient - DEBUG - Opening TCP socket: 127.0.0.1:5011
Oct 01 23:03:47 raspberrypi satnogs-client[6695]: 2017-10-01 23:03:47,325 - satnogsclient - DEBUG - Sending message: []
Oct 01 23:03:47 raspberrypi satnogs-client[6695]: 2017-10-01 23:03:47,327 - apscheduler.executors.default - INFO - Job "get_jobs (trigger: interval[0:01:00], next run at: 2017-10-01 23:04:14 UTC)" executed successfully
Oct 01 23:04:14 raspberrypi satnogs-client[6695]: 2017-10-01 23:04:14,453 - apscheduler.executors.default - INFO - Running job "get_jobs (trigger: interval[0:01:00], next run at: 2017-10-01 23:04:14 UTC)" (scheduled at 2017-10-01 23:04:14.423393+00:00)
Oct 01 23:04:14 raspberrypi satnogs-client[6695]: 2017-10-01 23:04:14,484 - apscheduler.executors.default - INFO - Running job "post_data (trigger: interval[0:02:00], next run at: 2017-10-01 23:04:14 UTC)" (scheduled at 2017-10-01 23:04:14.436367+00:00)
Oct 01 23:04:14 raspberrypi satnogs-client[6695]: 2017-10-01 23:04:14,489 - apscheduler.executors.default - INFO - Job "post_data (trigger: interval[0:02:00], next run at: 2017-10-01 23:04:14 UTC)" executed successfully
Oct 01 23:04:15 raspberrypi satnogs-client[6695]: 2017-10-01 23:04:15,627 - satnogsclient - DEBUG - Opening TCP socket: 127.0.0.1:5011
Oct 01 23:04:15 raspberrypi satnogs-client[6695]: 2017-10-01 23:04:15,628 - satnogsclient - DEBUG - Sending message: []
Oct 01 23:04:15 raspberrypi satnogs-client[6695]: 2017-10-01 23:04:15,629 - apscheduler.executors.default - INFO - Job "get_jobs (trigger: interval[0:01:00], next run at: 2017-10-01 23:05:14 UTC)" executed successfully
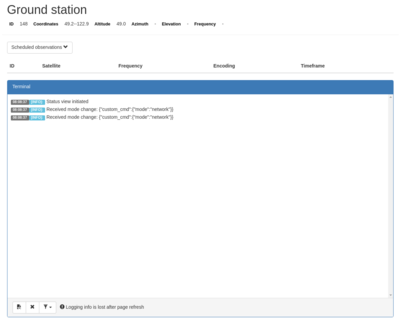
You can also try visiting satnog-client's web interface. In your browser, go to http://(ip address of your raspberry pi):5000. You should see something like this:
If you see that, great -- you're ready to schedule your first observation! If not, check out the Troubleshooting page.
