Difference between revisions of "Wiki/Replay observations from audio"
(Create page) (Tag: Visual edit) |
Nye.thompson (talk | contribs) m (Removed broken link) (Tag: Visual edit) |
||
| (2 intermediate revisions by 2 users not shown) | |||
| Line 1: | Line 1: | ||
{{Message|This page is under construction.}} | {{Message|This page is under construction.}} | ||
| − | + | ==Background== | |
| + | Running a SatNOGS station enables you to save the IQ files and look at the observation with other tools, these are not available for download from the usual [https://network.satnogs.org/observations/ Observations] page. Some do publish these on their own cloud storage or available by request. The possibility to get these are quite limited on the vast majority of the stations. | ||
| + | |||
| + | The Audio files are usually quite narrow and the mode selected changes it's behavior, it can be hard to use it for signals wider/higher/lower than what the original mode has requested. | ||
| + | |||
| + | One of the modes that has some opportunities is the BPSK flowgraph. Downloading one of these audio files will grant you a decent slice of the spectrum offset to 12kHz up (if baud was higher than 1200), this opens up for further processing, but how to do it ? | ||
| + | |||
| + | ==Converting back audio to IQ== | ||
| + | |||
| + | '''<big>An .exe file is now available to automate this process. See 'Automated back audio to IQ conversion' below</big>''' | ||
| + | |||
| + | Using our favorite SDR tools like [https://gqrx.dk/ gqrx], [https://www.sdrpp.org/ SDR++] etc will make it very easy to tune around and choose different modes, width etc, but they usually don't support this plain audio format. | ||
| + | |||
| + | Two methods have been tested successfully, both convert the audio file to a format these programs can use. This example uses [https://www.gnuradio.org/ gnuradio]-3.10, but 3.9 should also work just fine, 3.8 doesn't have OGG file support so you will have to convert it to WAV first. | ||
| + | |||
| + | Getting started in windows is usually a challenge for these tools so that is what this guide will address specifically, the package I used is [https://github.com/ryanvolz/radioconda/releases radioconda] and it includes gqrx and [https://gr-satellites.readthedocs.io/ gr-satellites] as well. | ||
| + | |||
| + | |||
| + | Lets start with the flowgraph itself, available for download [https://github.com/kng/satnogs_gr-satellites/tree/main/utils here] as wav2iq_raw.grc. | ||
| + | |||
| + | [[File:Wav2iq raw.png]] | ||
| + | |||
| + | Open the Wav File Source and browse to the ogg/wav you want to convert, then open File Sink and select the destination raw (you can copy the string from the wav source and just change the extension to .raw). Then simply run the flowgraph with the play button or F6. It should only take a few seconds to complete as indicated by a >>> Done. | ||
| + | |||
| + | In this example I'm going to use observation [https://network.satnogs.org/observations/6659851/ #6659851]. This has a audio file size of about 10MB and the resulting raw is almost 130MB, so one can understand why this is not uploaded to the network. | ||
| + | |||
| + | ==Opening RAW in gqrx== | ||
| + | |||
| + | Opening this file in gqrx is perhaps a bit cumbersome, but the dialog that appears on start is the Configure I/O devices, in this you will fill in a string formatted in this way: | ||
| + | <br>file=C:/exmple/satnogs_6659851_2022-10-26T04-12-41.raw,rate=24e3 | ||
| + | |||
| + | Note that the backslash is changed to forwardslash, and the rate at the end is the sample rate of the raw, in this case 24000 sps. | ||
| + | |||
| + | [[File:Gqrx configure iodev.png]] | ||
| + | |||
| + | After it's opened you can go ahead and select the mode and frequency etc. | ||
| + | |||
| + | [[File:Gqrx funcube bpsk.png]] | ||
| + | |||
| + | ==Automated back audio to IQ conversion== | ||
| + | You can automate the process described above using this package: [https://drive.google.com/file/d/1lnl4AnKG-jt8-0e2C1I39b-Mf4OtqpyK/view?usp=share_link wav2iq_wav.7z] | ||
| + | |||
| + | ===Installation=== | ||
| + | |||
| + | *Download the 7zip package to your Downloads directory. | ||
| + | *Decompress the wav2iq_wav.7z to the current directory, it will create wav2iq_wav directory with the files inside of it. | ||
| + | *Open the directory and scroll down to the bottom, there you will find wav2iq_wav.exe | ||
| + | *Right-click and select copy, then on the desktop right-click and select Paste shortcut, you can then rename the shortcut if you like | ||
| + | |||
| + | ===Conversion=== | ||
| + | Select a SatNOGS observation that is recorded with the bpsk mode (perhaps others in the future) and download the audio ogg file. When it has completed, drag-and-drop it to the previously created shortcut. It will take some time and a black window should open for a short while and then disappear. This should have created a new file in the same directory. It will be named like the satnogs_xxxx.ogg but with the extension .iq.wav | ||
| + | |||
| + | ''NOTE: If the black window persists and CPU load is low, there's probably a bad ending in the ogg that prevents it from exiting automatically, terminate it manually in that case.'' | ||
| + | |||
| + | {{Message|HINT: If you are filtering out an SSTV image you can trim down the ogg file in Audacity to the section with the transmission in before you convert it (as shown below)}} | ||
| + | [[File:Audacity.png|1000x1000px]]<br /> | ||
| + | |||
| + | ===Usage=== | ||
| + | The new file can be opened in SDR++ under Source, File: ... to open. | ||
| + | |||
| + | Under Radio, select USB as mode, Bandwidth to 3000, Snap interval to 10. Then start the playback with the play button in the top left. | ||
| + | [[File:Sdrpp-gui.png|alt=SDR++ interface showing appropriate settings|none|thumb|1000x1000px]] | ||
| + | |||
| + | |||
| + | Basic usage of SDR++ is clicking the waterfall where you want to listen, scroll wheel to adjust the frequency (uses snap interval). When using USB, the actual passband will be to the right of the cursor and should be fine tuned to make it sound properly. | ||
| + | |||
| + | <big>'''A new .wav file can be recorded during playback if you are filtering out an SSTV image to decode.'''</big> | ||
| + | |||
| + | If demodulating with MMSTV, adjust the lower blip to align perfectly with the 1200Hz mark. | ||
| + | [[File:Mmsstv spectrum.png|none|thumb|370x370px]] | ||
| + | |||
| + | |||
| + | |||
| + | <br />{{Message|WIP WIP WIP}} | ||
Latest revision as of 13:19, 5 February 2023
Contents
Background
Running a SatNOGS station enables you to save the IQ files and look at the observation with other tools, these are not available for download from the usual Observations page. Some do publish these on their own cloud storage or available by request. The possibility to get these are quite limited on the vast majority of the stations.
The Audio files are usually quite narrow and the mode selected changes it's behavior, it can be hard to use it for signals wider/higher/lower than what the original mode has requested.
One of the modes that has some opportunities is the BPSK flowgraph. Downloading one of these audio files will grant you a decent slice of the spectrum offset to 12kHz up (if baud was higher than 1200), this opens up for further processing, but how to do it ?
Converting back audio to IQ
An .exe file is now available to automate this process. See 'Automated back audio to IQ conversion' below
Using our favorite SDR tools like gqrx, SDR++ etc will make it very easy to tune around and choose different modes, width etc, but they usually don't support this plain audio format.
Two methods have been tested successfully, both convert the audio file to a format these programs can use. This example uses gnuradio-3.10, but 3.9 should also work just fine, 3.8 doesn't have OGG file support so you will have to convert it to WAV first.
Getting started in windows is usually a challenge for these tools so that is what this guide will address specifically, the package I used is radioconda and it includes gqrx and gr-satellites as well.
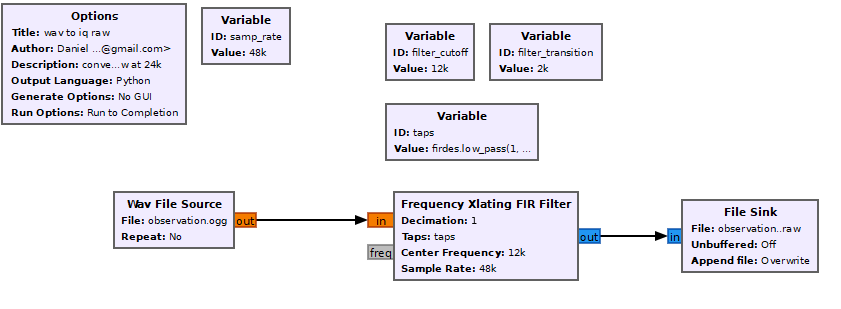
Lets start with the flowgraph itself, available for download here as wav2iq_raw.grc.
Open the Wav File Source and browse to the ogg/wav you want to convert, then open File Sink and select the destination raw (you can copy the string from the wav source and just change the extension to .raw). Then simply run the flowgraph with the play button or F6. It should only take a few seconds to complete as indicated by a >>> Done.
In this example I'm going to use observation #6659851. This has a audio file size of about 10MB and the resulting raw is almost 130MB, so one can understand why this is not uploaded to the network.
Opening RAW in gqrx
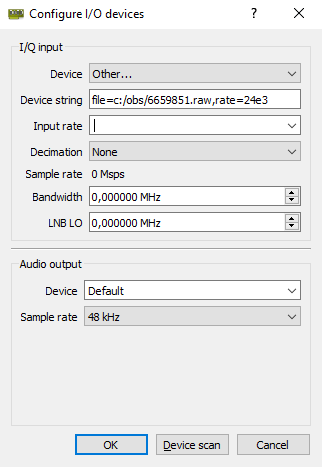
Opening this file in gqrx is perhaps a bit cumbersome, but the dialog that appears on start is the Configure I/O devices, in this you will fill in a string formatted in this way:
file=C:/exmple/satnogs_6659851_2022-10-26T04-12-41.raw,rate=24e3
Note that the backslash is changed to forwardslash, and the rate at the end is the sample rate of the raw, in this case 24000 sps.
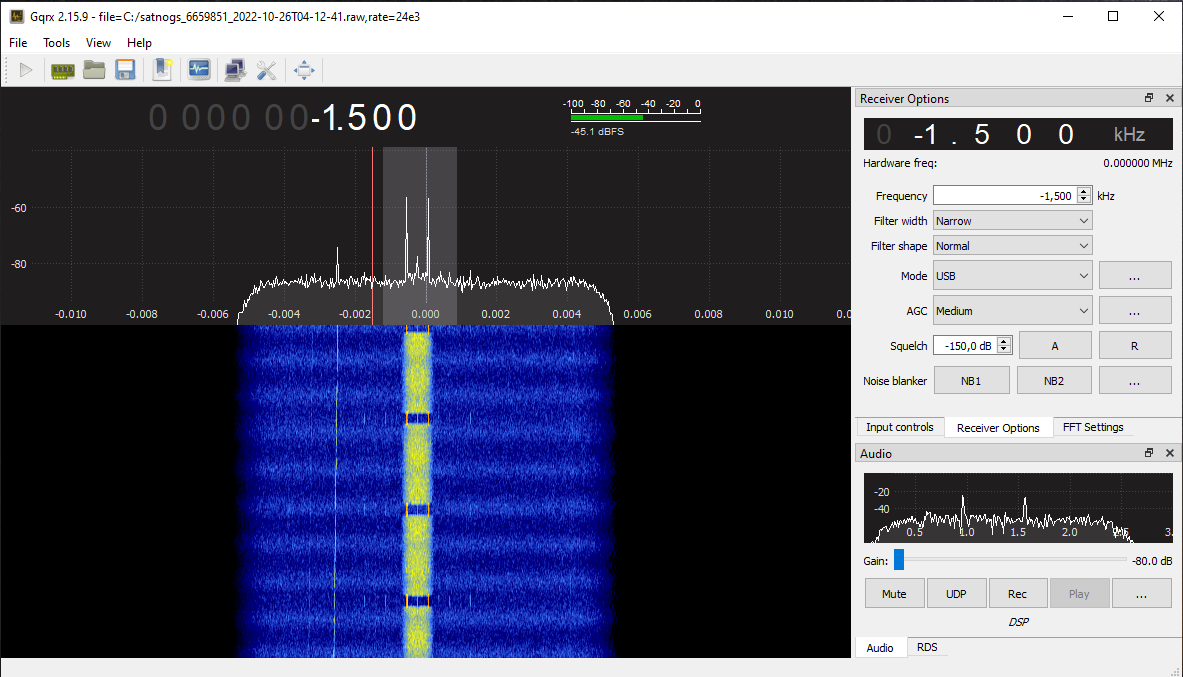
After it's opened you can go ahead and select the mode and frequency etc.
Automated back audio to IQ conversion
You can automate the process described above using this package: wav2iq_wav.7z
Installation
- Download the 7zip package to your Downloads directory.
- Decompress the wav2iq_wav.7z to the current directory, it will create wav2iq_wav directory with the files inside of it.
- Open the directory and scroll down to the bottom, there you will find wav2iq_wav.exe
- Right-click and select copy, then on the desktop right-click and select Paste shortcut, you can then rename the shortcut if you like
Conversion
Select a SatNOGS observation that is recorded with the bpsk mode (perhaps others in the future) and download the audio ogg file. When it has completed, drag-and-drop it to the previously created shortcut. It will take some time and a black window should open for a short while and then disappear. This should have created a new file in the same directory. It will be named like the satnogs_xxxx.ogg but with the extension .iq.wav
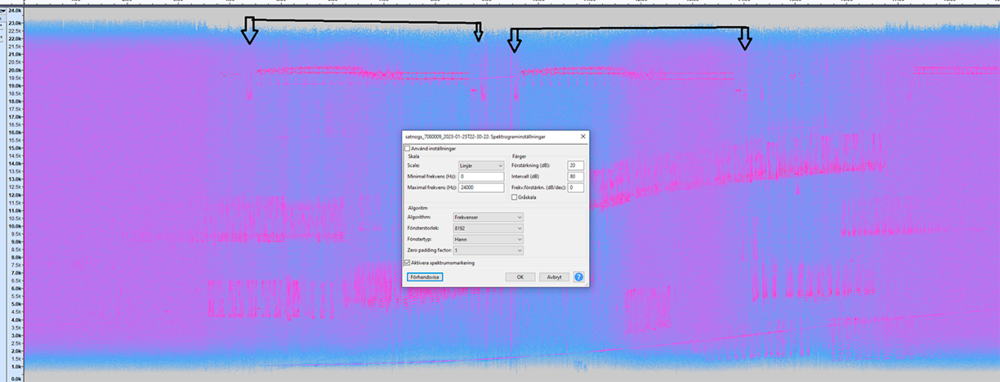
NOTE: If the black window persists and CPU load is low, there's probably a bad ending in the ogg that prevents it from exiting automatically, terminate it manually in that case.
Usage
The new file can be opened in SDR++ under Source, File: ... to open.
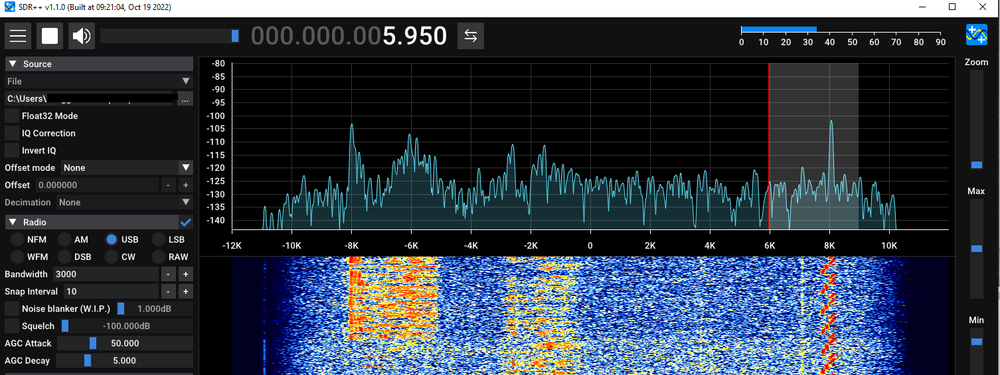
Under Radio, select USB as mode, Bandwidth to 3000, Snap interval to 10. Then start the playback with the play button in the top left.
Basic usage of SDR++ is clicking the waterfall where you want to listen, scroll wheel to adjust the frequency (uses snap interval). When using USB, the actual passband will be to the right of the cursor and should be fine tuned to make it sound properly.
A new .wav file can be recorded during playback if you are filtering out an SSTV image to decode.
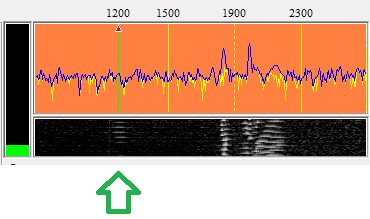
If demodulating with MMSTV, adjust the lower blip to align perfectly with the 1200Hz mark.
