Difference between revisions of "SatNOGS Rotator v3"
(→Sourcing) |
|||
| Line 53: | Line 53: | ||
'''Fixings / Pipe''' - eBay | '''Fixings / Pipe''' - eBay | ||
| − | |||
| − | |||
| − | |||
| − | |||
| − | |||
| − | |||
== Build Sequence == | == Build Sequence == | ||
Revision as of 10:48, 4 March 2016
| SatNOGS Rotator v3 | |
|---|---|
| Rotator Information | |
| Type: | Az/El |
| Cost: | {{{cost}}} |
| Release Information | |
| Status: | Beta |
| Latest Release: | Torx Flathead (v3.0) |
| Repository: | [1] |
| Documentation: | [2] |
Intro
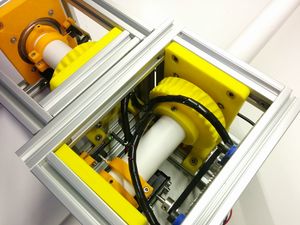
v3 marks a major re-haul of the SatNOGS Rotator design, with learnings from v2 applied. You can see a lot of the thinking and background research that was conducted prior to v3 development in this thread.
Specifications
| ' | SatNOGS v3 Rotator |
| Plastic Parts | 26 |
| Non Printed Parts approx. | 345 |
| Cost | ~ $220 |
| Controller Electronics | SatNOGS Rotator Controller |
| Type | Az/El (possible X/Y) |
| Motors | 2x NEMA 17 Stepper or 2x DC Motors |
| Frame Material | Aluminum T-slot 20x20 |
| Pro | |
| Con | |
Sourcing
3d Printing at a Fab Lab or you local hackerspace- If you don't have your own 3d printer then a local Fab Lab or hackerspace may be able to do it for you. Fab Labs and hackerspaces are places that have invested in the machinery and you can take the designs to them. Generally they need .stl files to import into the software that runs the machines but this should be discussed with the Fab Lab or hackerspace. You then pay for the colume of material or time or a combination of the two for each of the parts or any other agreement in place. FabLabs:[3] Hackerspaces:[4]
T Slot - If you don't want to cut the pieces yourself then here is a UK supplier[5] Hidden corner connectors - AliExpress gave the cheapest supplier
Stepper Motors - eBay
Belts - eBay
Fixings / Pipe - eBay
Build Sequence
- Make sure you have all parts
- Follow the instructions for mechanical assembly
- Once mechanical assembly is ready, construct the SatNOGS Rotator Controller and connect it to the assembly.
- You are ready! Proceed with testing.
Test Sequence
Test sequence needed
